Blog

Guide Dogs and People Who Have Low Vision

“You can see enough. Why do you need a guide dog?”
“Wow – Your vision is better than mine. Why do you have a guide dog?”

I am met with these criticisms all the time.

Hi, I’m Sarah. I’m a mid-partial, have a good chunk of useable vision, and I work with a guide dog.

Many people assume that guide dogs are only meant for people who are totally blind. Quite the contrary – Let me explain why I use a guide dog and how my dog helps me.

First and foremost, a guide dog is a mobility aid. In opposition to the white cane, I feel as though my dog makes life slightly easier even though I’m a partial. My dog can perform tasks that a cane cannot help with.

I don’t claim to be an O&M instructor or an expert. These points are just based on my own experiences. Always consult an O&M instructor before applying for a guide dog. Most guide dog schools require this before accepting an individual into the program.

Let’s break it down. I had to think about this. There are 5 key points I’d like to touch on.

1. Stairs: Although I can tell for the most part when I’m approaching stairs, I can’t always find that first step. Especially for stairs going down, my dog will stop before we descend the stairs. I tell her to “find the step” and she will stop just shy of the first drop-off. A cane can do that too, however, I feel as though there is a greater margin of error and which could result in some nasty medical bills. Since I’ve had my dog, navigating stairs in a public place such as an el station has been much easier.

2. Curbs: Sometimes when I use a cane, I miss finding the curb to cross an intersection. Pfft – That wouldn’t happen to a partial.. Uh, yes it would. Can you say danger? A cane can’t stop you from getting hit by a car if you overstep the curb, but a dog can pull you back. You can also prevent this by telling your dog to “find the curb” once you know you’re approaching an intersection. This ties into my next point.

3. Crossing Intersections: Contrary to popular beliefs, a guide dog cannot read traffic lights. However, they can and will pull you back if it’s unsafe to cross. Such was the case for me when I began working with Jim, my first dog. This moment was what made me realize that even partials can benefit from guide dogs. I was waiting to cross an intersection in Chicago. After listening for the surge, I determined it was safe to cross and told Jim “forward”. We took a few steps and he suddenly pushed me back a few feet. I felt wind in my face and looked to my right and saw the faint red glow of tail lights. I didn’t hear this car coming. However, I didn’t get hit by it because my dog was doing his job. Hybrid cars.. The bane of my existence. BUT – It was because of Jim that I am here unscathed.

4. Finding Objects/places: The “find” command is **extremely useful. Not all schools incorporate it into training, but if taught correctly, it can benefit the handler. Why? Because, I happen to be one of those partials who second guess what they see. So, the dog helps combat the urge to wander aimlessly until I find what I’m looking for. My dog can find trash cans, empty seats, and even the bathroom simply by me asking her to. This saves me a lot of time. We also work on targeting dropped items. Something I learned how to do by researching dog training.

5.  Companionship: People think that these dogs are robots. My dog may be a mobility aid, but she is also my best friend. We get lost together, meet new friends together, and overall, provide support. She lends me a listening ear and someone to talk to. Sometimes I prefer talking to her than a person! *grin*

There you have it. This is a very short list, but it covers the main points.

I think the negative stigma that is associated with partials deter many from getting a guide dog. Whatever your doubts may be, consider the pros before you let the cons outweigh the decision to apply for a guide dog. I occasionally use my cane, but prefer being with my dog. Think about it. I know this is a controversial topic, but it doesn’t hurt to discuss this further.

Till next time!

Windows 10 Magnifier – A First Look


For those of you who hadn’t heard yet the Windows 10 Technical Preview is available to the general public as of earlier this week. For information about how to get a copy of and install the technical preview check out Paul Thurrott’s on going articles on Winsupersite.com he also is a co-host of Windows Weekly Podcast on the TWiT Network. After downloading the 64-bit version of the Windows 10 Technical Preview I set out upon the epic journey of creating a virtual machine environment to install it into. In this particular case this would allow me to run Windows 10 on a Mac and run OS X at the same time; which I’m doing at the same moment as I’m writing this article. It worked out great for me. I had the benefit of using Mac’s Zoom feature while manipulating and running the Windows 10 installer; which simply appears as another window in OS X. If your interested in trying this out and you’re like me, not having a spare PC lying around, check out this handy article on LifeHacker about how to use VirtualBox to try out Windows 10. Hey its free by the way!

Ok, now for what you really wanted to know! What’s up with Windows Magnifier? Well to tell you the truth the interface looks exactly the same to me. First let me say I’m primarily a low-vision software user; day-to-day I use Mac’s Zoom and ZoomText on my Windows 7 PC. I also can’t get by without Inverted Colors or some equivalent High-Contrast mode. Now with that out of the way let me tell you about running Magnifier on Windows 10. So from the Start Menu…. Yes, that’s right, I said “Start Menu” its back baby! I opened the Run Command dialog box and simply typed in “magnify” and it launched as always. By default it launched at 200% magnification or 2x, so if you’re like me you’ll need to bump up the magnification quite a bit. You can do this using the same keyboard combination that you’ll find on Windows 7 systems. (To increase or decrease magnification press Windows Key + the plus or minus keys accordingly.)

win10tp_magnfier_transparent_magHere’s a picture of the translucent magnifying glass we’re familiar with from as far back as Windows 7. Oh by the way, in addition to starting at 200% Zoom, Magnifier also starts up in “Full Screen” mode just like it typically does on Windows 7 systems.

The Windows Magnifier seems to have all the core features of the older version we’d find on a Windows 7 system. The maximum zoom level goes up to 1600% or 16x, it has an “Invert Colors” Mode, and apparently the same rudimentary tracking features. Under “Tracking” in the Settings drop-down you see the three following options: “Follow the mouse”, “Follow the Keyboard focus”, and “Have Magnifier follow the text insertion point”. Here’s a screenshot of Windows 10 Magnifier settings panel, which undoubtedly looks familiar.

win10tp_magnifier
Here’s a screenshot of Windows 10 Magnifier settings panel, which undoubtedly looks familiar.

I guess the real test will be using it in a real world work environment over a more extended period of time. In the past I’ve found Magnifier, on Windows 7, to be… let’s say… not the greatest experience. Don’t get me wrong it’s a thousand times better than it was in previous iterations, back when it was a lens and you didn’t even have a full screen option. But I’ve never used it as a workhorse for day-to-day activities. If you had to tweak or fix somebodies system on the fly it was great but otherwise I’d opt for ZoomText, especially if it required several hours on the system. My chief problems with Magnifier were its tracking ability and I’ve seen it get flaky at times if the CPU had a serious draw on it. So while the UI and features look the same on the new Windows 10 Magnifier I can’t speak to the reliability when the system is under a load or the tracking. For that I’ll need some more time with it. We here at Low Vision Rants will strive to keep you updated about Windows 10 Accessibility features as we learn more; and as new Betas are released from Microsoft.

About My Setup:

These screenshots and opinions are based on my experimenting with Windows 10 Technical Preview Build 9841. This install was made inside a Virtual Machine on Mac OS X (Version 10.9.4 Mavericks) using VirtualBox 4.3.16. My VM was allocated 2GB of RAM and a 25GB Hard Drive. The iMac I was using is an i5 Quad-Core 2.5Ghz box with 4GB of RAM. So far Windows 10 has run pretty smooth under these conditions. You can find me on Twitter if you have any further thoughts. (@Certdoctor)

New iPhone 6 and iPhone 6 Plus and iOS 8 Accessbility Features

On September 9th Apple CEO Tim Cook took the stage at the Flint Performing Arts Center in Cupertino and introduced us to the new iPhone 6 and iPhone 6 Plus. In this column we’ll learn the difference between both of these devices and what accessibility improvements are included to make the new iPhone easier to use by people who are blind or visually impaired.

The iPhone 6 and iPhone 6 Plus are both bigger than the old iPhone 5S, which had a display measuring 4 inches. The iPhone 6 has a display of 4.7 inches and the 6 Plus has a humongous screen that measures in at 5.5 inches!

While both the iPhone 6 and iPhone 6 Plus both have an iSight front facing camera and an 8 megapixel rear facing camera, the Plus has a rear camera that uses technology called Optical Image Stabilization, which moves the sensor up, down, left, and right to prevent motion blur in low-light situations. This could be useful when taking pictures of bar codes or text on a menu or sign. This feature is unfortunately not available in the iPhone 6, but they didn’t completely leave the little brother in the dark. Both cameras feature a new feature called Focus Pixels which equates to faster focusing.

Aside from improved camera functionality and display size, these phones are very similar. They both feel reminiscent of a miniature iPad. The rear of each device is smooth brushed anodized aluminum that curves softly into its glass front face rather than being completely flat on the back with sharp squared-off edges… which was the look the past four iPhones adopted.

Both phones also have the same 64-bit A8 Processor on the inside, which means that your new device will be better, faster, and smoother when it comes to running high performance apps such as games. The iPhone is still the only mobile device on the market that has a 64-bit processor, so you will notice a difference when comparing this device to other similar handsets.

But enough of the marketing hype, you want to know what features will specifically affect you, right? Many of these additional features are also available in the iOS 8 update for pre-existing phones. You don’t necessarily have to go out and buy a new iPhone to get many of these accessibility features. Apple has always taken great care to make their devices incredibly accessible, and this year is no exception.

Apple is bringing Alex, its natural sounding male voice to iOS! You may have heard Alex speaking on OSX, which is the operating system that runs on Macs. Unfortunately this feature is only available on the iPhone 5S and up, and will not work on the iPhone 5C or older iPhones. For those who can use Alex, he will not be installed by default, you must have at least 1 gig of free space in order to install this enhanced quality speech engine. He will be available in all of the iOS voice technologies except for Siri. This includes VoiceOver, Speak Selection, and a new feature called Speak Screen.

Speak Screen is a feature for those of us with some limited vision but still need things read aloud on occasion. With this feature, a simple two finger swipe down gesture from the very top of the screen will prompt Alex to read the entire screen from top to bottom without having to keep VoiceOver running all the time. You can slow down or speed up the voice, rewind or fast forward, play and pause the speech via a floating controller on the screen.

iOS 8 added support for an on screen 6-dot Braille Keyboard, which you can use instead of the traditional QWERTY keyboard.

Apple has also finally allowed 3rd party system keyboards, which means that if the default method of text input doesn’t work for you, there are alternative options. This allows a developer to make custom keyboards with improved key spacing, size, color and so on. Fleksy is a keyboard designed to be used without looking at the screen, and it is one of the very first 3rd Party keyboards made available.

Another feature called QuickType predicts what you are going to type and gives you a list of suggestions along the top of your keyboard. The neat thing about this feature is that it is content-sensitive, meaning that it analyzes your e-mail, texts, and other information to give appropriate suggestions. An example could be when writing an e-mail to your boss where they said “Is the task completed?” and you type the letter C and are given “completed” as a suggestion. This feature is helpful to those who suffer from typing fatigue.

The new Grayscale feature is great for those who have color blindness. Similar to the Invert Colors feature, Grayscale turns off the color on your screen, casting everything into shades of gray. This feature will affect all apps, games, and multimedia, making everything easier to see for those with certain eye conditions.

Zoom has also been improved with enhanced controls. For starters, you can now have half the screen zoomed in while leaving the keyboard unzoomed! This is helpful as you will be able to see the keyboard while zoomed into those tiny edit fields in your web browser.

You can now have a zoom window or “lens” on the screen that you can resize and move around with your finger instead of blowing up the entire screen. You can invert colors, make everything Grayscale, or invert and Grayscale everything inside the zoom window.

There is also a new Zoom Controller feature that gives you a floating menu where you can quickly access several zoom controls such as Toggle Zoom, Full Screen Zoom, Resize Lens, Choose Filter, Show Controller, and a slider bar at the bottom which allows you to zoom in or out.

Display Zoom is yet another feature for those who have limited vision. It may be more useful for those who are on the border of legal blindness rather than those who have severe vision loss. This feature essentially lowers the resolution of the screen which increases the size of text, icons, buttons and other elements on the screen. If you have an iPhone 6 or 6 Plus, when looking at the Home Screen in standard mode you will now have 6 rows of icons. Once Display Zoom is activated you’ll only have 5 rows of icons but everything will appear to be just a bit bigger. This feature does not work on any of the older iPhone handsets.

While iOS 8 boasts some pretty positive changes, many VoiceOver users have reported a myriad of bugs and issues. While most of these bugs were reported during the beta phase of iOS 8, many have gone unheard by Apple.

Some of the issues include Bluetooth Keyboard problems, audio ducking difficulties, spontaneous VoiceOver crashes, and focus issues while navigating around the phone. For a comprehensive article about these bugs, check out this article from AppleVis, https://applevis.com/blog/advocacy-apple-braille-ios-news/accessibility-bugs-ios-8-serious-minor. If you plan on upgrading your existing phone to iOS 8, or are about to buy a new iPhone 6 or iPhone 6 Plus, be warned! The problems regarding accessibility may have a negative impact on some users and caution should be used when considering an upgrade.

These bugs may have been fixed by the time you see this article, but I would do some research on the web before upgrading. We hope that many of the bugs will be squashed with the impending release of iOS 8.01.

Different Types of Zoom For Different Jobs

One of the things that irritates me is the fact that manufacturers think that simply magnifying the screen is “good enough” and they stop at that. However, there are other types of Zoom that often are left out or are only provided on expensive CCTV’s or custom software made specifically for people with very low vision. I think we need to make the tech industry aware of the different types of Zoom and the ways they can help your overall experience on said devices.

Zoom In

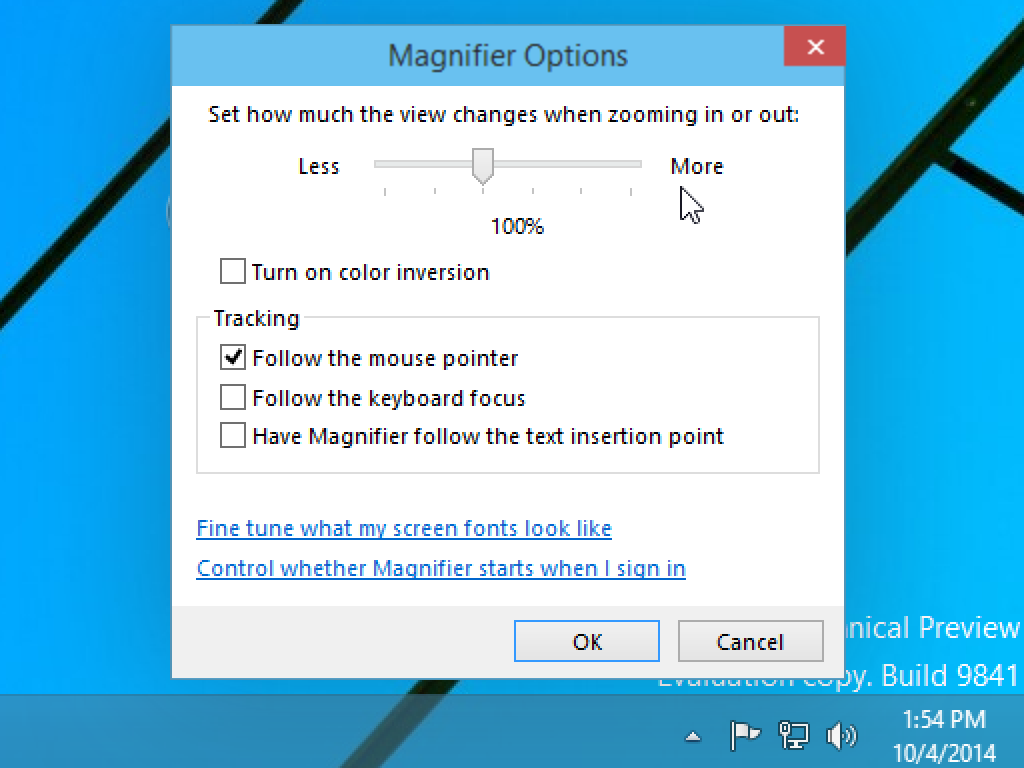
This is the most widely provided type of magnification, a simple overall magnification of everything. But you can only see a postage stamp sized portion of your operating system at a time. This kind of zoom has its place and can be useful.

However, there are major downsides to this type of Zoom, such as the need to constantly pan around which gets REALLY OLD if you are reading a very long selection of text. Some systems make panning easier, see David Ward’s article on Windows 8.1 Low Vision Tools. Windows 8.1 will stop panning as soon as you lift your fingers from the screen whereas iOS has momentum when you swipe your view from the left to the right, meaning it’ll keep moving which makes navigation a bit easier.

Panning your view can be harder on certain devices depending on how many fingers you have to use. Android has the best compromise in my opinion. You can either double tap the screen and hold down with one finger to temporarily zoom, then use that one finger to move around. Or you can triple tap to Zoom-In and lock the magnification in place. Now you can use two fingers to pan your view around. In comparison, iOS makes things difficult by forcing you to use three fingers to move the “virtual camera” around.

Adjusting the magnification level can also be a bit of a pain on iOS devices compared to Android as well. My iPhone requires that I double tap the screen with three fingers, then hold my fingers down on the second tap, then swipe those three fingers up to Zoom-In, or swipe down to Zoom-Out. Android in comparison just wants a Pinch-To-Zoom gesture to adjust the magnification level.

Zooming-In also sucks if you have a lot of notifications popping up, you end up missing them because your focus is not always in the corner of the screen where these notifications appear. Some operating systems will steal the focus of the “viewfinder” temporarily to show you that something is going on, but it often doesn’t return you to the spot of the screen where you were so now you gotta try and figure out where you left off.

The traditional method of magnifying has all kinds of problems, and we only scratched the surface of the type of problems it can introduce, this is why other methods need to be more widely used to improve the overall user experience.

Magnifying Glass

This is the second most widely used method of magnification, a docked magnifying bar, or a floating magnifying glass that allows you to see the entire desktop, but enlarges a specific section of the screen. This feature can be useful for those with minor vision loss, but is all but useless for those with more severe vision problems. Sometimes this is the only feature available and THAT needs to change!

Text-Only Zoom

Mozilla Firefox is one of the programs that utilize this feature really well. Instead of Zooming-In and panning around, you can increase the text size without having to compromise the ability to see the overall picture. You can scroll down with your mouse or use your arrow keys to read an article, the text will wrap to the next line and the images will show up in-line while you read the content.

The downside to this method is that many web developers don’t expect the user to blow up the text on their website, so you get the occasional text-cluster. This happens when there isn’t enough space allocated for text to expand in size and things start to overlap.

Mobile operating systems often don’t utilize this feature, which is a shame as I feel it is much better than pinch-to-zoom.

Segmented Zoom

I saw this mode of magnification utilized on a CCTV and fell in love with the idea. I’d love to see wider implementation of this feature on PC’s and mobile devices. The idea is that you typically get a small view but you can tap an area of the screen and fit an image or block of text to the size of the screen. As I understand it, some mobile browsers kind of do this if you double tap a paragraph of text it will try to to snap the block of text or image to the center of the screen and it will zoom in.

The problem is that navigation in this mode isn’t fluid enough, you should be able to swipe between page elements more easily and have the system dynamically zoom-in and out depending on how much information needs to fit on the screen.

I would also love the ability to treat each page element as a sandbox where you have to purposely try and escape from the element before you can be moved to the next one. Meaning that I should be able to scroll from top to bottom of a paragraph in Zoomed-In mode without fear of jumping to the next paragraph until I’m done with the previous one. When magnification is enabled it can be difficult to know what is going to appear on your screen next, more granular control of when and how you will be advanced to the next element would alleviate anxiety among low vision users.

Word by Word Highlighter

Another form of magnification I’ve only seen on highly advanced CCTV’s that should be available more widely is a word-by-word highlighter. Typically you only see this feature when combined with a screenreader. I’d like to be able to swipe from word to word and have it highlighted or boxed in. This is helpful for people with severe vision loss, or those who are easily distracted by too much information. This feature combined with sand boxed paragraphs would be immensely helpful.

System Font Resizing

This is a feature that needs vast improvement and wider implementation. Apple is a prime example of a company that needs massive improvements. They have added Dynamic Type to iOS to provide larger text in certain apps such as Notes, Mail, Calendar, and iMessage. However, the Notification Center, Home Screen, App Store, and many other critical areas do not allow any adjustment in text-size.

Android is a bit better, but the Home Screen and App Drawer are areas where the text size has always been quite small. There are more tweaks, launchers, hacks and apps to help with the text-size issues in Android, but the system should have better flexibility out-of-the-box.

Custom Interface

There are a few overlays or launchers you can use to create an environment of high-visibility throughout the system without having to Zoom-In or Magnify anything!

For example, CDesk by AdaptiveVoice is a Windows application that provides a user interface that has large print menus, high contrast, built-in screen-reader and much more. There are 20 core applications within this special environment such as e-mail, web browser, word processor, book reader and a whole lot more.

Another great example is BiG Launcher for Android which replaces the typical UI with a much simpler and larger interface. You can still use the wide array of apps available on Android but you can also spend a lot of time in this interface as it has its own SMS Messenger, Dialer, Contacts, Call History and more.

Samsung provides something similar on some of their phones called Easy Mode, which is perfect for first time smartphone users or those who have a difficult time with cluttered pages full of tiny widgets and piles of icons. This isn’t perfect for people with vision issues but it is an option which is included in some Samsung devices out-of-the-box.

Conclusion

There you have it, these are the types of magnification that I am aware of. If anyone knows of any other methods to increase the visibility of items on your PC or mobile device please leave a comment. As always, I don’t know everything and the likelihood that I’ve missed something or even gotten something wrong is very possible. Thanks for reading, I look forward to your thoughts and ideas on how to improve the visual experience for people with low vision!
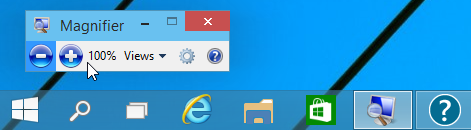
Windows Phone 8.1 Low Vision Tools

Over the past few weeks I’ve been experimenting with a Nokia Lumia 520, that I bought off the Microsoft store. It is a prepaid AT&T model and only cost $59 (USD). My mission was to update it to the newest Developer release of the operating system version 8.1. This new release features Narrator; but I’m not going to talk much about that today. Instead I’ll be talking about the Low-Vision features that it provides.

Now I should mention that out of the box the phone has a system wide Magnifier and a High-Contrast mode. So this is prior to the update to 8.1.

So here’s the Low-Vision features you might find useful:

  1. Magnifier (System wide feature just like in Apple’s iOS. Not sure how big it will get; I’m guessing around 500%.)
  2. High-Contrast Theme (This feature is just what it sounds like but has some added advantages over Apple’s iOS in my opinion.)
  3. Text-Size (This is the ability to change many system level fonts across the entire phone.)
  4. An Internet Explorer Zoom Override (This feature allows you to zoom into web content even if the page or app usually wouldn’t allow you too. I don’t have a lot of experience trying this yet, but sounds fantastic.)

So that’s the core Low-Vision features. The Magnifier smoothly and quickly activates once enabled in the “Ease of Access” section under settings. Instead of a three-finger operation like on iOS it however is activated by two-fingers. And navigation is done using two fingers.

Rant: Here’s a problem you’ll find using it. While smooth and fast and the zoom level granularity is on par with iOS it is harder to navigate with. The core of the problem is panning; or moving the field of view around while zoomed in. On iOS you don’t even think about it but when you swipe with three fingers and release the panning generally continues with a certain level of momentum. So with a few quick swipes you can be anywhere on the screen. Not so on Windows Phone. Soon as you pull your two fingers off the screen the panning navigation stops. The result is you can’t get anywhere on the screen without making sure your fingers remain in contact with the screen while swiping. Once you get use to it its not that bad. But it strikes me that it takes longer to get anywhere and makes my navigation feel more laborious than I think it needs to be. Oh, an here’s another rant, you can’t run Magnifier and Narrator at the same time. Ok I’m done, let’s move on to something more positive.

Now I said before that the “High-Contrast” theme was a nice feature; even perhaps better than iOS. And here’s why; It doesn’t affect photos. That’s right. Your photos are not eerie reverse colored images out of some horror film. Additionally, High-Contrast seems to make the system level fonts pop out more than even turning up the brightness to maximum will. Additionally, “High-Contrast” seems to have been designed by someone who had some brains. For example: The settings menu by default is white lettering on a black or dark gray background. Now if this was iOS we all know what would happen. The settings menu would be black letters on a white background when High-Contrast was enabled; not so with Windows Phone. The settings menu remains white lettering on a dark background; an as I said the fonts are even brighter than normal. So well done Microsoft!

Well that’s it for now but I’ll be sure to follow up soon. If you’d like to hear an audio demo of Narrator being used to setup my phone check this out. If you have any questions feel free to contact me on Twitter (@Certdoctor).

What Does The GW Micro and Ai Squared Merger Mean For Us?

Ai Squared and GW Micro recently announced that they would be merging. This could be a very good thing for everyone or it could spell disaster, depending on which way the people behind the scenes handle things.

I am hoping that this will result in a win for both totally blind people and those who are low vision. It could mean more low-vision features built directly into Window-Eyes, or maybe they will integrate better screenreader technology into ZoomText!

I for one would love to see the two products combined into one all-purpose tool that someone could use to get the best of both worlds.

According to Ai Squared’s FAQ, the merger will only affect the focus and commitment to products made by both companies in a positive way.

The FAQ says “Among the primary goals of this merger are: (1) to combine our strengths and expertise to deliver better versions of our existing product lines as well as to develop new products; and (2) to deliver a robust family of products covering the complete spectrum of vision loss—i.e. from slight vision loss to total blindness.”

The FAQ does say that Window-Eyes and ZoomText do work together just fine, but that ZoomText doesn’t always track the cursor of WindowEyes when using a web-browser. They are planning to fix this in the near future though.

Of course, the merger may not turn out well for loyal GW Micro fans. Certain products may be cut or drastically change from what they once were. I am particularly worried about things like GW Connect and GWSocialEyes, which may or may not fit the paradigm of the newly merged company. The FAQ doesn’t suggest such a change on the horizon so I don’t think we have much to worry about.

All we can do is cross our fingers and hope this is a good thing for everyone. Stay tuned for more information!

If you want to read the FAQ about the merger check out the link below.

Ai Squared Merges With GW Micro

Low Vision Accessibility for Windows 8

I was ranting as I usually do on Twitter about how difficult it is to use a tablet with Windows 8.1 while being visually impaired. My actual tweet said “Every time I look at a Windows 8.1 Tablet or laptop I have to squint at the text on Metro UI apps. Anyone have a fix for that?”

I got a response from @MicrosoftHelps that said “@byron27 Happy to help! Refer to CurtisFuehr’s reply here: http://msft.it/60199wgf to enlarge the fonts on apps. Does this help? ^KW”

This forum is from October of 2012 so I don’t think we’re going to find any real answers here. I was hoping some of my grievances would have been dealt with in Windows 8.1 Update 1…. but so far I haven’t heard anything.

The solution that Curtis outlined on the forum was…

“From the Start Screen just type the word “font” and select the Settings filter on the right.  You should see an option to “Make text and other items larger or smaller”.  Click on that and adjust the text or everything to the desired size.”

This solution changes the size of items on the desktop via adjusting the DPI scaling. His instructions were not effective for any of the Live Tile apps in the Modern UI.

Andreas Bovens replied with this solution, which I think is the same one I already tried a few months ago… and the problem is that it will only work on full sized desktop displays and not on tablets.

1. Click on the Start button to get the new Windows UI

2. Start typing “font” (without quotes)

3. Click on “Settings”

4. Click on “Make everything on your screen bigger”; this opens PC settings (which is different from the classic Configuration Screen)

5. Set “Make everything on your screen bigger” to On.

Other recommendations for enlarging text on Metro UI apps include this tidbit from Ronnie Vernon. “Most of the Store Apps will respond to WinKey (+ or -) to Zoom In and Zoom Out.”

I believe this only activates and deactivates the Windows Magnifier which is a pixel zoom and has a plethora of aesthetic and functional flaws.

Robert Aldwinckle suggested doing Ctrl and + or – to adjust text size within some apps. He also suggested that “Semantic zoom (e.g. reverse pinch gesture) is probably available.”

In a posting near the end of this forum jhb23 said exactly what I’ve been thinking all along regarding the way computers are trending toward smaller and smaller font. He said “With the largest population cohort in recent history hitting the age of vision deterioration, and with all kinds of new technology, MS ought to seize the chance to really serve a population.”

Amen brother! I couldn’t agree more! He continued by saying…

“We’re also the people who latched on to the PC and have used it fanatically for 30 years. Now you’re going to jam us between finger-painting (Metro) we don’t have equipment for, and text we can’t read????”

Man, this guy should write a blog for us, he’s full of that Low Vision Rage! Anyway, this forum was refreshing because at least I was able to find other people who have the same difficulties and kept getting the same crappy answers I was getting. The long URL for this forum is http://answers.microsoft.com/en-us/windows/forum/windows_8-desktop/is-there-a-way-to-increase-the-text-size-in/9630bd5b-58ff-47be-8fc6-688de5c921ca.

The next time I wind up in a store with Windows 8 Tablets I’ll try these steps to see what happens. I don’t think we’re going to see any major differences in how Windows 8.1 works regarding adjusting font sizes… but I’d LOVE to be wrong about that!

Extreme Measures!

As I was finishing up my previous post, I received an e-mail from Blair Alper of Uddle Systems. He sent me a picture of himself wearing this ridiculous looking get-up that he was using to see better during an electronics project. (I so want this thing!)

Blair wearing a pair of glasses with magnifier loops atached and a giant head mounted light!

His e-mail said “When you don’t see well, sometimes you have to resort to extreme measures to be able to get the job done”.

The subject of his e-mail was “I have Byronicus of Borg beat!” This is because he took THIS picture of me a couple of years ago at a Ham Radio Convention!

Byron wearing a Jeweler's Loop and LED light attached to a glasses frame.“I am Byronicus of Borg. Resistance is futile, your life as it has been is over. From this time forward you will service… US!”

Devices Every Person With Low Vision Should Carry

I know most of you know all about the basics of being partially sighted, but I figured I should make a list of the things that make having low vision a bit more tolerable. So here are the things that I carry in my backpack every day that I use to see things that I otherwise would have trouble with.

The first and probably most helpful item in my arsenal is a handheld magnifier. Since not all magnifiers are created equal, I carry two of them. The first one is a fairly low power folding magnifier with an LED light on it. I use this one for reading books, enlarging text on my phone or computer, or getting serial numbers from the back of devices. The other magnifier I use is a jeweler’s loop. This is a very small but very high power magnifier that I use for those times when what I need to see is really small.

The next device in my murse (man purse) is a monocular. This is great for reading signs, looking for landmarks, seeing what is across the street, or just checking out the view. There are all kinds of monoculars. Everything from pocket sized ones to giant military type units. The main differences are the amount of magnification and the width of the eye piece. I’ve noticed that there seems to be a correlation between the amount of magnification and the size of the viewer, meaning that if you have a very powerful monocular the eyepiece is going to be a pinhole.

One of my most critical pieces of gear as a person with low vision is my white cane. I know a lot of people who are high partials don’t like to use canes but it has come in handy when asking people for directions. People don’t brush me off as easily if they see a cane in my hand. Also, it can be hard to see the curb or a set of stairs especially on a bright and sunny day. So, I may feel a little awkward carrying a cane when I can see pretty well, but it saves me the embarrassment of falling on my face quite often.

My next helpful device is a talking compass, which helps me figure out which direction I am facing. Recently I have started using a Talking Compass app on my iPhone rather than my hardware talking compass. This is great because I can’t always figure out which side of the street my bus is going to be on. If I know I want the westbound bus, I can align myself with the traffic and find out if the traffic is flowing east or west.

I’ve never been much for sunglasses as they tend to dull the contrast of everything around me and make it hard to see things, but they are a godsend on those bright days where going outside causes your eyes to shrivel up into little “face raisins”. Since the traditional type of sunglasses don’t fit over the top of my regular glasses very well, I use a pair of wrap-around sunglasses or a set of clip-on flip-up sunglasses. Again, its a rare occasion for me to use sunglasses but they can and do come in handy from time to time.

Another helpful item to keep on hand is a baseball cap. I’m not much for wearing hats… my bald spot gets mad if I don’t give it attention. However, the sun can sometimes throw so much glare that its hard to see what is in front of you. A hat keeps you from having to shield your face with your hand all the time. Also, on rainy days where your vision can be obscured by raindrops on your glasses, a hat makes a handy barrier between your eyes and the falling drops of water.

Sometimes I have to write something down but the pen or pencil I used was fairly dull or light colored which makes reading the critical information a pain. This is why I always carry a 20/20 felt tip marker. The writing always comes out nice and bold and easy to read later.

Sometimes you find yourself stuck outdoors in the dark with no street lights to show you the way. This is why I always carry a small flashlight in my magic bag of tricks. It’s also helpful when you drop something on the floor and there isn’t enough light to help you find it again. The one I carry is a head mounted light. I use this because my cane is usually in one hand and I like to try and keep at least one hand free in case I fall down and have to catch myself. Also, with the head mounted light, it will shine anywhere you happen to be looking which really helps.

The last but probably most versatile thing I carry with me is my iPhone. It’s got an app for almost every situation. There are apps for looking up the mass transit schedule, apps to find your way home via GPS, magnification apps, distance viewing apps, reading and OCR apps, and even a flashlight app or two!

We’ll cover the apps that help me the most in a future article, until then why don’t you post your list of helpful devices in the comments section?

Theme Font and Size Changer for Thunderbird and Firefox

I’ve been using Mozilla Firefox and Thunderbird for years for their wonderful Zoom feature which can be activated by holding CTRL and the + key to enlarge the text. This is a wonderful step by Mozilla to assist visually impaired people. However, Thunderbird has always been a struggle to use due to the fact that the list of messages and other elements were still way too small for my liking. I had been using an old version of Eudora before switching to Mozilla Thunderbird and loved the large font in their message list. Now thanks to Clay and Renee in Ft. Payne, Alabama I have been made aware of an add-on for Thunderbird that lets you change the global font size and font family used for the user interface in both Firefox and Thunderbird.

Thunderbird with Theme Font & Size Changer

As you can see, with minor adjustments I have made Thunderbird much more tolerable!

Here is a brief excerpt from the add-on webpage…

“Different from add-ons that enlarge and reduce text on web pages, Theme Font & Size Changer changes the font size and font family in all windows, menus, toolbars, etc within Firefox itself. All font size and font family changes are instantly applied and they are saved permanently and through sessions. You may assign your favorite font into your browser interface and change its size as you wish.”

You can download this add-on from https://addons.mozilla.org/en-us/thunderbird/addon/theme-font-size-changer/.

I hope this little tip helps you as much as it has helped me. Thank you Clay and Renee for pointing it out!