For those of you who hadn’t heard yet the Windows 10 Technical Preview is available to the general public as of earlier this week. For information about how to get a copy of and install the technical preview check out Paul Thurrott’s on going articles on Winsupersite.com he also is a co-host of Windows Weekly Podcast on the TWiT Network. After downloading the 64-bit version of the Windows 10 Technical Preview I set out upon the epic journey of creating a virtual machine environment to install it into. In this particular case this would allow me to run Windows 10 on a Mac and run OS X at the same time; which I’m doing at the same moment as I’m writing this article. It worked out great for me. I had the benefit of using Mac’s Zoom feature while manipulating and running the Windows 10 installer; which simply appears as another window in OS X. If your interested in trying this out and you’re like me, not having a spare PC lying around, check out this handy article on LifeHacker about how to use VirtualBox to try out Windows 10. Hey its free by the way!
Ok, now for what you really wanted to know! What’s up with Windows Magnifier? Well to tell you the truth the interface looks exactly the same to me. First let me say I’m primarily a low-vision software user; day-to-day I use Mac’s Zoom and ZoomText on my Windows 7 PC. I also can’t get by without Inverted Colors or some equivalent High-Contrast mode. Now with that out of the way let me tell you about running Magnifier on Windows 10. So from the Start Menu…. Yes, that’s right, I said “Start Menu” its back baby! I opened the Run Command dialog box and simply typed in “magnify” and it launched as always. By default it launched at 200% magnification or 2x, so if you’re like me you’ll need to bump up the magnification quite a bit. You can do this using the same keyboard combination that you’ll find on Windows 7 systems. (To increase or decrease magnification press Windows Key + the plus or minus keys accordingly.)
 Here’s a picture of the translucent magnifying glass we’re familiar with from as far back as Windows 7. Oh by the way, in addition to starting at 200% Zoom, Magnifier also starts up in “Full Screen” mode just like it typically does on Windows 7 systems.
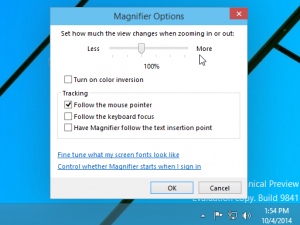
The Windows Magnifier seems to have all the core features of the older version we’d find on a Windows 7 system. The maximum zoom level goes up to 1600% or 16x, it has an “Invert Colors” Mode, and apparently the same rudimentary tracking features. Under “Tracking” in the Settings drop-down you see the three following options: “Follow the mouse”, “Follow the Keyboard focus”, and “Have Magnifier follow the text insertion point”. Here’s a screenshot of Windows 10 Magnifier settings panel, which undoubtedly looks familiar.

I guess the real test will be using it in a real world work environment over a more extended period of time. In the past I’ve found Magnifier, on Windows 7, to be… let’s say… not the greatest experience. Don’t get me wrong it’s a thousand times better than it was in previous iterations, back when it was a lens and you didn’t even have a full screen option. But I’ve never used it as a workhorse for day-to-day activities. If you had to tweak or fix somebodies system on the fly it was great but otherwise I’d opt for ZoomText, especially if it required several hours on the system. My chief problems with Magnifier were its tracking ability and I’ve seen it get flaky at times if the CPU had a serious draw on it. So while the UI and features look the same on the new Windows 10 Magnifier I can’t speak to the reliability when the system is under a load or the tracking. For that I’ll need some more time with it. We here at Low Vision Rants will strive to keep you updated about Windows 10 Accessibility features as we learn more; and as new Betas are released from Microsoft.
About My Setup:
These screenshots and opinions are based on my experimenting with Windows 10 Technical Preview Build 9841. This install was made inside a Virtual Machine on Mac OS X (Version 10.9.4 Mavericks) using VirtualBox 4.3.16. My VM was allocated 2GB of RAM and a 25GB Hard Drive. The iMac I was using is an i5 Quad-Core 2.5Ghz box with 4GB of RAM. So far Windows 10 has run pretty smooth under these conditions. You can find me on Twitter if you have any further thoughts. (@Certdoctor)
